Welcome to the Let's Do Blazor mini-series. Through this series, I plan to introduce you to the basics of creating web applications with Blazor. First, I will guide you through the project creation and the basic structure. Then we will start building our web application and throughout the second part of the series add some additional functionalities that would make our application super useful.
My approach will be to go step-by-step and explain how you achieve the functionalities you need to create a functional web application. I will be using Visual Studio 2022 with a Community license and I recommend you use the same.
If you want to learn more about Blazor, what types of projects there are and overall introduce yourself with basic concepts, go ahead and learn my previous article that covers the aforementioned themes: Discover Blazor for Web development
After a bit of introduction, let's start with the fun part.
Setting up the project
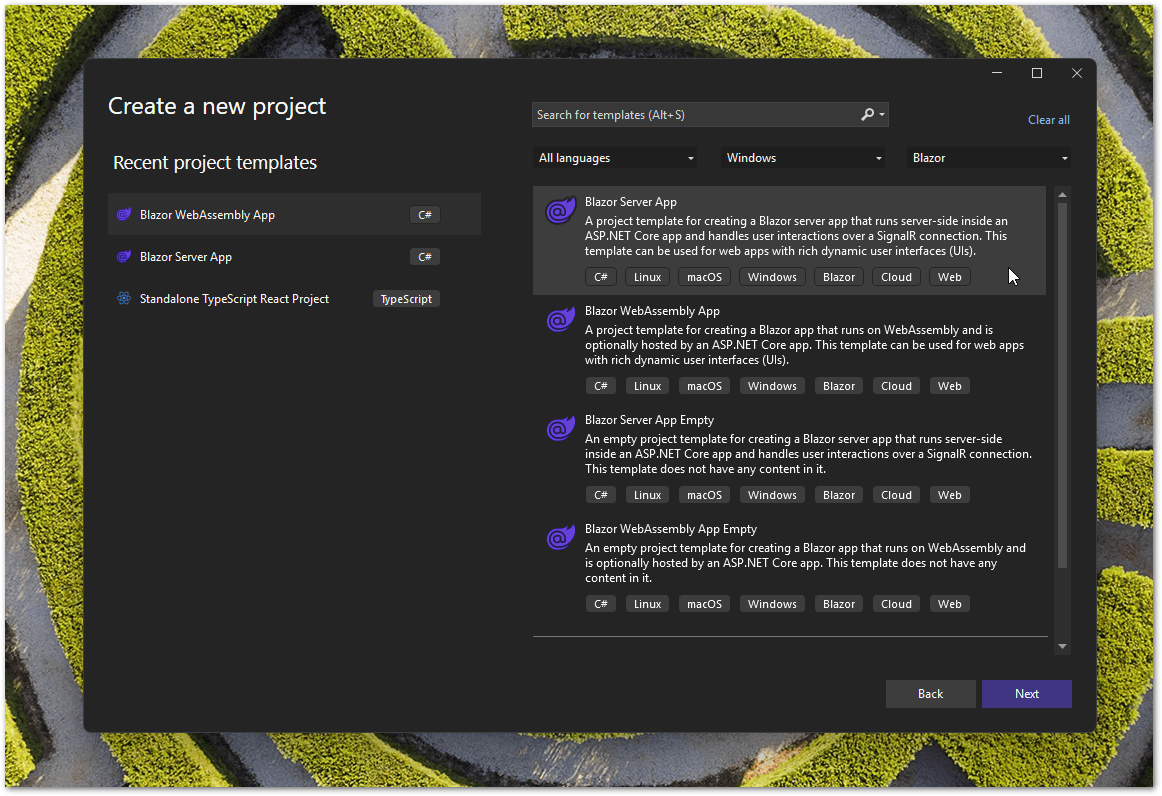
As I've previously mentioned, I'm using Visual Studio so fire it up and on the splash-screen select Create a new project. There are several types of projects you can create and for our web application we will use Blazor Server App:

Blazor server App, what's that all about? Well, it is an application that runs on a server inside the ASP.NET Core app so when you need to deploy the application from local development, you need to find the server that supports ASP.NET. UI updates in the browser are handled with a SignalR connection with the server. You can imagine it as a persistent bi-directional connection between the two. The downside is if you are offline, the app won't work so that is something to think about when developing the Blazor server app.
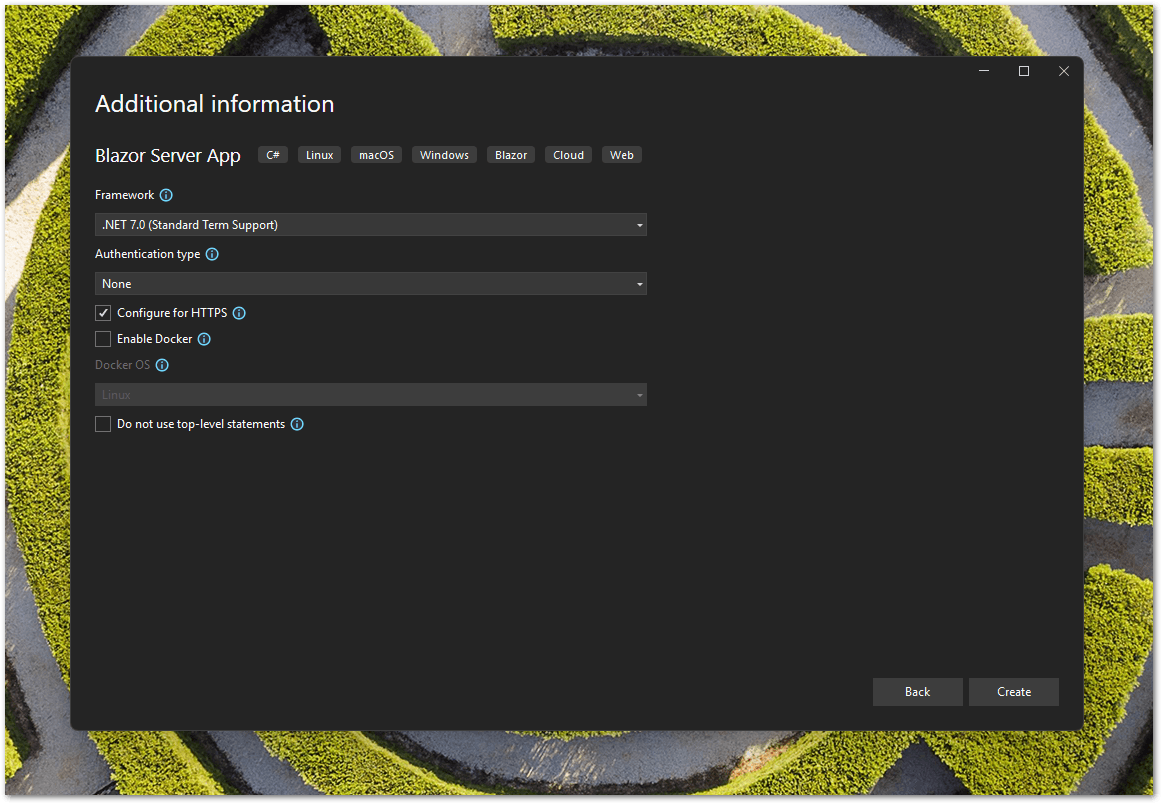
In the next step, I will write LetsDoBlazor as a name and go forward. This takes me to the selection of Framework, Authentication, and several more options. I will use the latest .NET 7.0, leave None for the Authentication type, and check the checkbox for Configure for HTTPS. If you are starting Visual Studio for the first time, you will most likely need to install certificates to use HTTPS. This procedure is short and straightforward so I won't go into details about it.

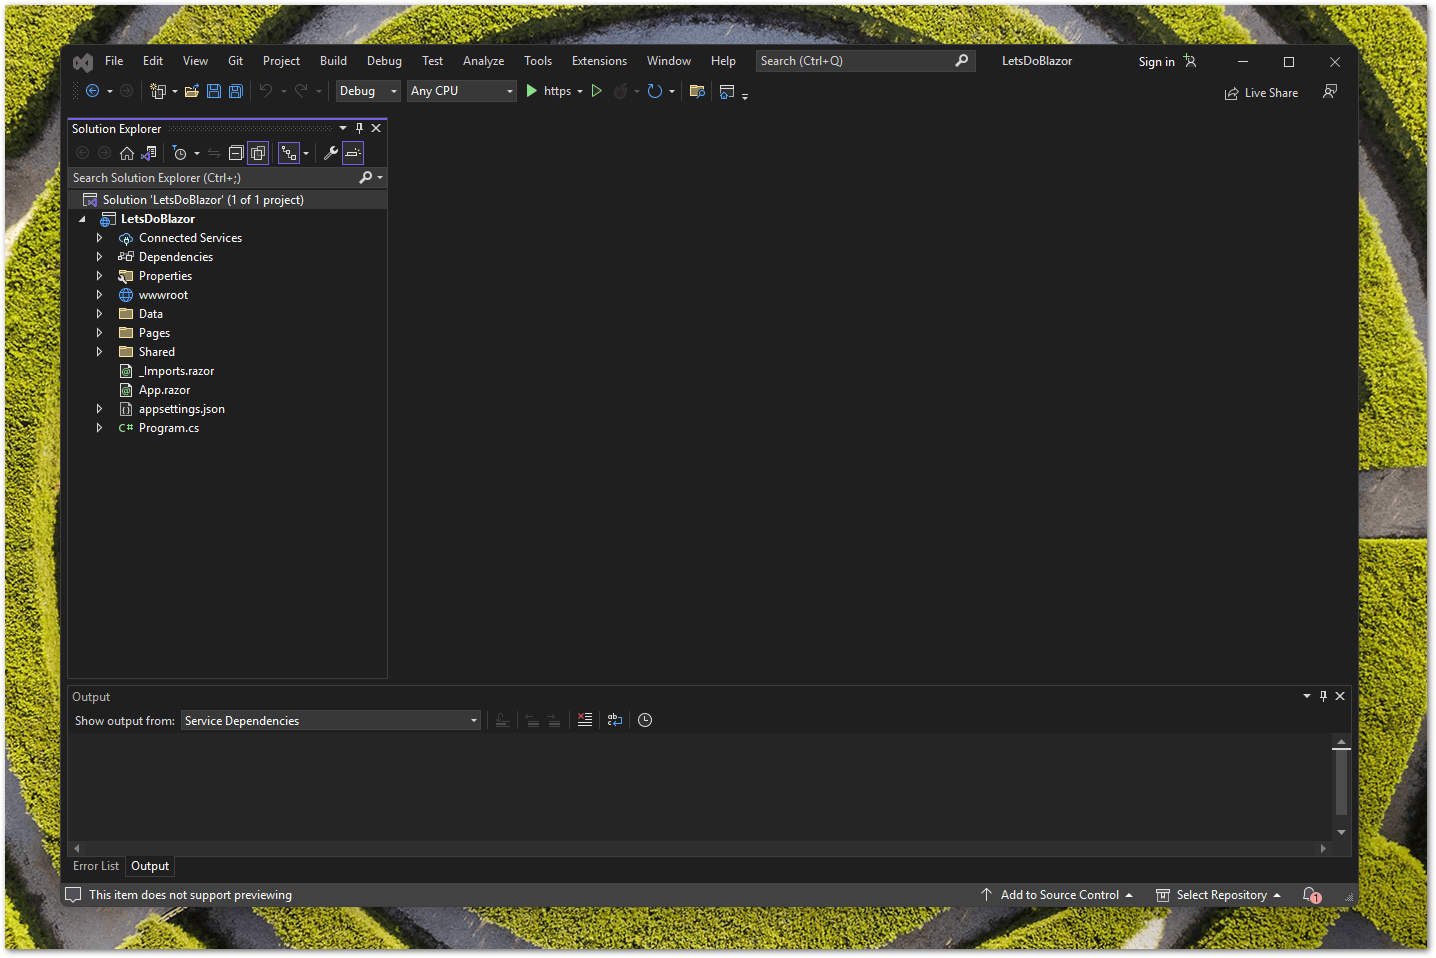
We are using a quite standard setup for our project so after hitting Create we will get the Visual Studio windows showing the folder structure in the left side pane.

Blazor Server App structure
Let's go through the application structure that was upon project creation made for us. In the root folder, we have 4 files and we will start with App.razor.
App.razor
<Router AppAssembly="@typeof(App).Assembly">
    <Found Context="routeData">
        <RouteView RouteData="@routeData" DefaultLayout="@typeof(MainLayout)" />
        <FocusOnNavigate RouteData="@routeData" Selector="h1" />
    </Found>
    <NotFound>
        <PageTitle>Not found</PageTitle>
        <LayoutView Layout="@typeof(MainLayout)">
            <p role="alert">Sorry, there's nothing at this address.</p>
        </LayoutView>
    </NotFound>
</Router>
We can cite the Microsoft documentation on this one:
As we can see the entire file is a Router component that differentiates two cases: either the route is found or the route is not found. The contents of the <Found> element
<RouteView RouteData="@routeData" DefaultLayout="@typeof(MainLayout)" />
<FocusOnNavigate RouteData="@routeData" Selector="h1" />
will be displayed when a match is found for the requested route. Similarly, when a match is not found for the requested route, the contents of the <NotFound>
<PageTitle>Not found</PageTitle>
<LayoutView Layout="@typeof(MainLayout)">
    <p role="alert">Sorry, there's nothing at this address.</p>
</LayoutView>
will be displayed. When the match is found for the requested route, the RouteData essentially gives the information that specifies the page that will be displayed.
We also see the DefaultLayout that sets the type of layout to be used if the page does not declare any layout. In this case, we see MainLayout which is our default layout in this example that contains sidebar navigation, header, and footer.
Program.cs
The next file we will go through in our project's root directory is Program.cs:
using LetsDoBlazor.Data;
using Microsoft.AspNetCore.Components;
using Microsoft.AspNetCore.Components.Web;

var builder = WebApplication.CreateBuilder(args);

// Add services to the container.
builder.Services.AddRazorPages();
builder.Services.AddServerSideBlazor();
builder.Services.AddSingleton<WeatherForecastService>();

var app = builder.Build();

// Configure the HTTP request pipeline.
if (!app.Environment.IsDevelopment())
{
    app.UseExceptionHandler("/Error");
    // The default HSTS value is 30 days. You may want to change this for production scenarios, see https://aka.ms/aspnetcore-hsts.
    app.UseHsts();
}

app.UseHttpsRedirection();

app.UseStaticFiles();

app.UseRouting();

app.MapBlazorHub();
app.MapFallbackToPage("/_Host");

app.Run();
Microsoft documentation gives us the following information about Program.cs:
ASP.NET Core apps created with the web templates contain the application startup code in the
Program.csfile. TheProgram.csfile is where:
Services required by the app are configured.
The app's request handling pipeline is defined as a series of middleware components.
If you have done any development with NodeJS and ExpressJS you might see some similarities in the middleware portion of the code (starting from app.useExceptionHandler()). These components perform operations on HttpContext and invoke the next middleware in the line or terminate the request. Whenever you see Use{Feature} extension method it represents a middleware component.
For now, this is everything we will cover regarding Program.cs so let's go to our first folder and its contents:
Shared/MainLayout.razor
We have already mentioned MainLayout when we talked about the DefaultLayout property on the RouteView component. When we open this file we see the following project default structure:
@inherits LayoutComponentBase

<PageTitle>LetsDoBlazor</PageTitle>

<div class="page">
    <div class="sidebar">
        <NavMenu />
    </div>

    <main>
        <div class="top-row px-4">
            <a href="https://docs.microsoft.com/aspnet/" target="_blank">About</a>
        </div>

        <article class="content px-4">
            @Body
        </article>
    </main>
</div>
We see a pretty well-known HTML structure with some parts we will go through right now. Inheriting LayoutComponentBase at the beginning defines a Body property for the rendered content inside the layout.
Next, you will see <PageTitle> component. This component enables rendering an HTML <title> element to a HeadOutlet component. If you're confused about what is a HeadOutlet component you're not alone. Essentially, it is a component that is in the end appended to the existing head contents instead of replacing the contents.
Within a parent <div> element with the class "page", we see a navigation sidebar within a child <div> element and the <main> element with the nested @Body property. This layout always shows the sidebar through the <NavMenu/> razor component and the main area always renders the content.
Shared/NavMenu.razor
Let us go to the next file in the Shared folder. NavMenu.razor is a razor component that contains the code for our navigation sidebar. Let's look at the file contents:
<div class="top-row ps-3 navbar navbar-dark">
    <div class="container-fluid">
        <a class="navbar-brand" href="">LetsDoBlazor</a>
        <button title="Navigation menu" class="navbar-toggler" @onclick="ToggleNavMenu">
            <span class="navbar-toggler-icon"></span>
        </button>
    </div>
</div>

<div class="@NavMenuCssClass nav-scrollable" @onclick="ToggleNavMenu">
    <nav class="flex-column">
        <div class="nav-item px-3">
            <NavLink class="nav-link" href="" Match="NavLinkMatch.All">
                <span class="oi oi-home" aria-hidden="true"></span> Home
            </NavLink>
        </div>
        <div class="nav-item px-3">
            <NavLink class="nav-link" href="counter">
                <span class="oi oi-plus" aria-hidden="true"></span> Counter
            </NavLink>
        </div>
        <div class="nav-item px-3">
            <NavLink class="nav-link" href="fetchdata">
                <span class="oi oi-list-rich" aria-hidden="true"></span> Fetch data
            </NavLink>
        </div>
    </nav>
</div>

@code {
    private bool collapseNavMenu = true;

    private string? NavMenuCssClass => collapseNavMenu ? "collapse" : null;

    private void ToggleNavMenu()
    {
        collapseNavMenu = !collapseNavMenu;
    }
}
Apart from the HTML structure, in this file, we also have a @code directive that houses our C# code that gives the navigation sidebar its "powers" to react to the user input. I will presume the HTML code doesn't need any additional explanations and focus on the C# code.
This code enables toggling the navigation menu when it is viewed on smaller screens. It is done through the use of @media queries and classes in NavMenu.razor.css. So the way how it functions is fairly simple. We have a navbar-toggler which is a hamburger icon button that is only visible on smaller viewports. To toggle the visibility of the Navigation menu on smaller viewports we are adding "collapse" as a class to the <div> element.
We first need a way to know whether the navigation menu is open or closed. So on the first line inside the @code block, we are declaring a private variable of type boolean collapseNavMenu and assigning it the value true.
On the next line of code, we are declaring, evaluating, and assigning the variable all in one line:
private string? NavMenuCssClass => collapseNavMenu ? "collapse" : null;
We are declaring a private string that is nullable (hence the ?) named NavMenuCssClass with the value being the result of the ternary operator.
The ternary operator has the following syntax:
condition_expression ? statement_1 : statement_2
If the value of the boolean collapseNavMenu is true then the value "collapse" will be assigned, otherwise null will be assigned.
We can use the NavMenuCssClass variable inside the class attribute of the <div> element simply by appending @ sign:
<div class="@NavMenuCssClass nav-scrollable" @onclick="ToggleNavMenu">
All that is left to do is to create a method that will switch the value of th collapseNavMenu variable between true and false. We can see that in action in the method called ToggleNavMenu():
private void ToggleNavMenu()
    {
        collapseNavMenu = !collapseNavMenu;
    }
This private method that doesn't return anything (void), simply changes the value of the collapseNavMenu variable to the opposite. We reference this method in the @onclick handler within our <button> element:
<button
   title="Navigation menu"
   class="navbar-toggler"
   @onclick="ToggleNavMenu">
            <span class="navbar-toggler-icon"></span>
</button>
So in this Razor component, we have seen how we can control the DOM element through click action.
Shared/SurveyPrompt.razor
<div class="alert alert-secondary mt-4">
    <span class="oi oi-pencil me-2" aria-hidden="true"></span>
    <strong>@Title</strong>

    <span class="text-nowrap">
        Please take our
        <a target="_blank" class="font-weight-bold link-dark" href="https://go.microsoft.com/fwlink/?linkid=2186158">brief survey</a>
    </span>
    and tell us what you think.
</div>

@code {
    // Demonstrates how a parent component can supply parameters
    [Parameter]
    public string? Title { get; set; }
}
As it can be seen from the code, this component is fairly simple and it shows us one important concept which you can see in the @code section.
With the [Parameter] attribute before a variable declaration, we are allowing a parent component to pass data to the child component.
[Parameter]
    public string? Title { get; set; }
Now the parent component can pass the data in the following manner (I am showing a part of the Index.razor located in the Pages folder:
...
<h1>Hello, world!</h1>

Welcome to your new app.

<SurveyPrompt Title="How is Blazor working for you?" />
If you start the application, you will see "How is Bazor working for you?" in bold as you can see in the SurveyPrompt component:
...
<strong>@Title</strong>
...
With the Shared folder complete, we will cover several files in Pages folder:
Pages/_Host.cshtml
@page "/"
@using Microsoft.AspNetCore.Components.Web
@namespace LetsDoBlazor.Pages
@addTagHelper *, Microsoft.AspNetCore.Mvc.TagHelpers

<!DOCTYPE html>
<html lang="en">
<head>
    <meta charset="utf-8" />
    <meta name="viewport" content="width=device-width, initial-scale=1.0" />
    <base href="~/" />
    <link rel="stylesheet" href="css/bootstrap/bootstrap.min.css" />
    <link href="css/site.css" rel="stylesheet" />
    <link href="LetsDoBlazor.styles.css" rel="stylesheet" />
    <link rel="icon" type="image/png" href="favicon.png"/>
    <component type="typeof(HeadOutlet)" render-mode="ServerPrerendered" />
</head>
<body>
    <component type="typeof(App)" render-mode="ServerPrerendered" />

    <div id="blazor-error-ui">
        <environment include="Staging,Production">
            An error has occurred. This application may no longer respond until reloaded.
        </environment>
        <environment include="Development">
            An unhandled exception has occurred. See browser dev tools for details.
        </environment>
        <a href="" class="reload">Reload</a>
        <a class="dismiss">🗙</a>
    </div>

    <script src="_framework/blazor.server.js"></script>
</body>
</html>
According to Microsoft documentation:
_Host.cshtml: The root page of the app implemented as a Razor Page:
When any page of the app is initially requested, this page is rendered and returned in the response.
The Host page specifies where the root
Appcomponent (App.razor) is rendered.
We will go further and see another page from the template:
Pages/Index.razor
@page "/"

<PageTitle>Index</PageTitle>

<h1>Hello, world!</h1>

Welcome to your new app.

<SurveyPrompt Title="How is Blazor working for you?" />
As you can see from the route defined in @page directive, you will see this page when you navigate to / or home. It is quite simple with the most important part being the parameter passed to the SurveyPrompt component.
Summary & Coming up next
We have gone through the creation of the Blazor server app project and the core structure that the project creates. I've highlighted the most important parts of the core application files.
In the next part, we will go into the Weather forecast page which deals with fetching data asynchronously and also a Counter page where we will do some modifications on our own.
Thank you for reading. I'm looking forward to meeting you in the next part.


